Tips
-
Top wing screws

If you tighten the top wing screws too much, you might tweak the wing mounts. Just tighten the screws all the way and then backed them off 1/2 turn to stop the wing mount from tweaking. There is still a solid connection, but the wing is now allowed to float a little during tumbles.
-
Arm mount insert position

With all the rear roll center adjustments available in the B6 platform, it can be confusing communicating what each arm mount insert position means. We can use directional terms such as center, half, and full. So for this picture, the inserts are "half up and half in." We have the same position in the "C" arm mount, so the toe is still 3° with 1° anti-squat.
-
Arm mount inserts

The inserts are the same for the "C" and "D" arm mounts. The inserts and aluminum "C" arm mounts are included in the kit; however, the "D" arm mount is plastic.
If you want to have all the rear roll center, pin height, toe, and anti-squat adjustments, get the #91688 Aluminum "D" Arm Mount.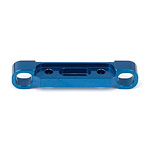
#91688 B6 FT Aluminum Arm Mount, D -
Bellcrank

Use steel screws with the aluminum or kit plastic bellcrank. There is a lot of stress on these parts and the weight savings and bling of titanium isn't worth the non-centering and inconstant steering that can happen if the screws get bent.
-
Shocks and wing

If you move your shocks from the rear of the arm to the front of the arm, and want to keep the wing in the same place, move the wing back the thickness of the boss that the tower mounts to. This is roughly 5mm.
-
Steering link ballstud

If you're not able to get full throw to the right, this left steering link ballstud may be too high. With all the different servos, servo horns and tolerance build-up, the articulation of the drag link (steering link) may be the limiting factor. The aluminum bellcrank calls for 2mm here, but I had to go to 0 in order to get full throw.
-
Rear hub

On the rear hub, the kit calls for an unflanged 3mm nut (top). I prefer to run a #25392 flanged (bottom) to help spread out the load for this assembly.
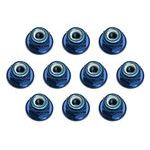
#25392 FT Locknuts, 3 mm, aluminum -
Steering stop spacing

For smoother steering on carpet, eliminate steering block chatter during full throw by adding a screw here as a limiter, then setting the servo throw to stop at the screw.
-
Battery hold-down thumbscrews

You can replace the battery hold-down thumbscrews with the larger #91458 thumbwheels.
#91458 Battery Strap Thumbwheels -
B6 Laydown Transmission Conversion

The B6 Laydown Transmission Conversion comes with everything you need to convert your B6D from a standup configuration to laydown.
"Laying down" the transmission lowers the vehicle's overall center of gravity and reduces the polar moment, allowing for increased corner speed in higher-grip conditions.#91705 B6 Laydown Transmission Conversion -
Anti-roll Bar Instructions
-
Chart: eyelets to use

You can mount the shocks on the front of the arms only if you use the laydown transmission. Benefits: better landing off of jumps, faster cornering, Used for high grip surfaces such as carpet, Astroturf™ or sugar tracks
FRONT inside hole on arm short eyelet middle hole on arm short eyelet outside hole on arm long eyelet REAR shocks on front of arm short shocks on rear of arm long -
Chart: gearbox, diffs, arms
Best combination for each kit.
Goal Best Kit Choice laydown gearbox, ball diff, flat arms B6D laydown gearbox, gear diff, flat arms B6 laydown gearbox, ball diff, gull-wing arms B6 standup gearbox, gear diff, flat arms B6D standup gearbox, ball diff, gull-wing arms B6D -
Chart: titanium screw locations and sizes

#91755 FT B6 Titanium Screw SetFlat Head Screws
3mm x 8mm #25201 #8553 al
#91592 ti6 Side rail to chassis 2 Arm mount [C] to chassis 3mm x 10mm #25202 #8555 al
#91593 ti4 Side rail to chassis 3 Motor plate to gear box 4 Gear box to chassis (B6D only) 6 Gear box to chassis (B6 only) 3mm x 12mm #25203 #8556 al
#91594 ti4 Front tower to top plate 2 Chassis brace to chassis 2 Wing to wing mount 3mm x 16mm #25204 #91596 ti 2 Front bumper to chassis 2 Front bulkhead to chassis 2 Rear gear box brace to chassis Button Head Screws
3mm x 6mm #31531 #8550 al
#91580 ti2 Front axle 2 Gear cover 3mm x 8mm #31532 #8552 al
#91581 ti4 Steering block arm to steering block 4 Servo mount to servo 2 Motor to motor plate 3mm x 10mm #25211 #8554 al
#91582 ti2 Servo mount to side rail 2 Battery strap nut to battery strap 3mm x 12mm #89202 #91583 ti 2 Top plate to front ball stud mount 2 Top plate to side rail 2 Steering bell crank to steering rack 4 Wing mount to rear tower 4 Rear tower to gear box 3mm x 14mm #25187 #91584 ti 4 Steering block to caster block 4 Gear box halves (B6D only) 6 Gear box halves (B6 only) 2 Shock to rear arm 2 Gear box to rear ball stud mount 3mm x 20mm #25188 #91587 ti 2 Shock to front tower 2 Shock to front arm 3mm x 24mm #89204 #91589 ti 2 Shock to rear tower -
Chart: Arm Mount Insert Chart
Arm Mount Insert Chart for the RC10B6 and RC10B6D
C Mount D Mount Toe Anti-
squatRoll
CenterPivot
PositionCenter Center 3 1 Med. Med. .5 up .5 up 3 1 High Med. .5 down .5 down 3 1 Low Med. .5 in .5 in 3 1 Med. Narrow .5 out .5 out 3 1 Med. Wide 1 up 1 up 3 1 High Med. 1 down 1 down 3 1 Low Med. 1 in 1 in 3 1 Med. Narrow 1 out 1 out 3 1 Med. Wide .5 up and in .5 up and in 3 1 High Narrow .5 up and out .5 up and out 3 1 High Wide .5 down and in .5 down and in 3 1 Low Narrow C Mount D Mount Toe Anti-
squatRoll
CenterPivot
Position.5 down and out .5 down and out 3 1 Low Wide 1 up and in 1 up and in 3 1 High Narrow 1 up and out 1 up and out 3 1 High Wide 1 down and in 1 down and in 3 1 Low Narrow 1 down and out 1 down and out 3 1 Low Wide .5 up Center 3 1.5 Med. Med. .5 down Center 3 .5 Med. Med. .5 in Center 3.5 1 Med. Med. .5 out Center 2.5 1 Med. Med. 1 up Center 3 2 High Med. 1 down Center 3 0 Low Med. 1 in Center 4 1 Med. Narrow C Mount D Mount Toe Anti-
squatRoll
CenterPivot
Position1 out Center 2 1 Med. Wide .5 up and in Center 3.5 1.5 Med. Med. .5 up and out Center 2.5 1.5 Med. Med. .5 down and in Center 3.5 0.5 Med. Med. .5 down and out Center 2.5 0.5 Med. Med. 1 up and in Center 4 2 High Narrow 1 up and out Center 2 2 High Wide 1 down and in Center 4 0 Low Narrow 1 down and out Center 2 0 Low Wide C Mount D Mount Toe Anti-
squatRoll
CenterPivot
Position